Adding structure and semantics with XSLT 2.0
Transforming unstructured narrative content to structured, feature-rich XML
Priscilla Walmsley
Managing Director, Datypic, Inc.
July 7, 2011
Abstract
When you are converting existing content to e-book formats, to DITA, or to other structured standards, you are often inferring and adding structure to your documents. The advanced regular expression and grouping capabilities of XSLT 2.0 make it an excellent language for converting and enhancing content. This article will examine the features of XSLT 2.0 that are most useful when converting unstructured or semi-structured narrative content to a more structured vocabulary, and work through several common scenarios.
Table of Contents
Introduction
Traditionally, narrative content has been marked up to convey how it should look (for example, font size or text alignment), rather than its real structure or meaning. This is true of content destined for print in books and office documents, as well as many Web pages. Some narrative content is not marked up at all, and is just represented as paragraphs in plain text.
Since the advent of content management, electronic publishing, and advanced searching and querying technologies, content owners are realizing the power of structured information and marking up their new content accordingly. But many have a backlog of content that is still unstructured or semi-structured, or marked up only for presentation.
Existing content can be made much more useable by adding structure to it, which enables:
- Styling content separately for multiple output devices such as smart phones, e-book readers and alternate Web browsers
- Implementing interactive behavior associated with certain kinds of text, for example hyperlinks for intra- or inter-document references, or pop-up directions for addresses
- Generating alternate representations of the content, such as tables of contents, indexes and summary views
- Providing more focused searching based on fields in the content
- Ensuring more consistent formatting across an entire body of content
- Improved verification of the content, for example determining whether intra-document references in a legal document are valid
Using XSLT 2.0
XSLT 2.0 is a well-adapted technology for adding structure to narrative content, which increasingly is represented in XML or something that can be easily converted to XML, like HTML. Unlike some popular scripting languages for manipulating text, XSLT is completely XML-aware. It understands the many variations in XML syntax, encoding and namespaces.
XSLT is also suited for narrative content because of its flexibility. The use of template rules to handle various "events" in the input document means that the conversion can be content-driven rather than strictly controlled by a sequential process.
Unlike XSLT 1.0, which was geared more toward styling XML, XSLT 2.0 has advanced capabilities for converting content, which include:
- Identifying patterns in text via regular expressions
- Grouping elements by value or position
- Making multiple passes at a document in one stylesheet
- Splitting a document into many documents, or joining many documents into one
To use XSLT, the first step is to get your content into XML. Most document editors and other content tools have an XML export capability. Depending on the tool, the XML may be prohibitively complex, and the first step should be to convert the XML to a simplified form so it is easier to work with.
If you are converting from HTML, HTML Tidy will turn your HTML into XHTML, which can be input for XSLT because it is well-formed XML. It will also simplify your documents.
The techniques
The rest of this article describes techniques that can be used to add structure and semantics to content using XSLT 2.0. Particular attention is paid to XHTML and Microsoft® Word XML as input documents, but these concepts apply to any narrative input document.
All of the examples in this article can be downloaded as a zip file. For XSLT 2.0 processing, I recommend Saxon.
Recognizing textual patterns
It is often useful to recognize a particular pattern in text and mark it up. URLs, email addresses, phone numbers, intra-document references, and Wiki-type formatting all follow common patterns that can be identified using regular expressions.
Example 1 shows an input document that contains email addresses in plain text. Suppose I want to mark up each email address using an a (anchor) element in order to enable a link to the email address, which in HTML would allow a user to click on the address to send an email to it.
<document>
 <p>Priscilla Walmsley can be reached at pwalmsley@datypic.com.</p>
 <p>Questions about XSLT in general are best asked on the XSL list at
    xsl-list@lists.mulberrytech.com (subscription required.) </p>
</document>
The XSLT shown in Example 2 accomplishes this goal. It makes use of the XSLT 2.0 analyze-string instruction, which tests a string to see if it matches a regular expression. The analyze-string instruction has two child elements: matching-substring, which says what to do with substrings that match the pattern, and non-matching-substring, which says what to do with the rest of the text.
In my example, the first template rule matches every text node in the input document. Whenever it finds text that matches the regular expression specified in the regex attribute, it inserts an a element. It gives it an href attribute that concatenates the string "mailto:" with the email address. It also puts the email address in the contents of the a. Inside a matching-substring instruction, the period character "." represents the string that matched the pattern.
If all or part of a text node does not match the pattern, it is simply copied, as specified in non-matching-substring. The second template rule in the XSLT is instructing the processor to copy all elements and continue on to their children, so nothing else is changed other than the email addresses.
<xsl:stylesheet version="2.0"
 xmlns:xsl="http://www.w3.org/1999/XSL/Transform">

<xsl:template match="text()">
 <xsl:analyze-string select="."
      regex="[A-Za-z0-9._%-]+@[A-Za-z0-9.-]+\.[A-Za-z]{{2,4}}">
  <xsl:matching-substring>
   <a href="mailto:{.}">
    <xsl:value-of select="."/>
   </a>
  </xsl:matching-substring>
  <xsl:non-matching-substring>
   <xsl:copy/>
  </xsl:non-matching-substring>
 </xsl:analyze-string>
</xsl:template>

<xsl:template match="*">
 <xsl:copy>
  <xsl:copy-of select="@*"/>
  <xsl:apply-templates/>
 </xsl:copy>
</xsl:template>

</xsl:stylesheet>
The output of the XSLT, with email addresses marked up as a elements, is shown in Example 3.
<document>
 <p>Priscilla Walmsley can be reached at
   <a href="mailto:pwalmsley@datypic.com">pwalmsley@datypic.com</a>.</p>
 <p>Questions about XSLT in general are best asked on the XSL list at
   <a href="mailto:xsl-list@lists.mulberrytech.com">xsl-list@lists.mulberrytech.com</a>
   (subscription required.) </p>
</document>
Adding structural containers
At a higher level, it is often useful to add structure representing divisions or sections of a document. You might be adding structure to conform to a particular XML vocabulary, like DocBook. Or you may want to clearly delineate sections of content so that they can easily be repurposed, using a technology like DITA.
For example, Example 4 shows an XHTML input document that has a very flat structure. The section headings (h1 and h2) appear at the same level as the paragraphs, with no structural tags to group the sections.
<html>
 <h1>Chapter 1</h1>
 <h2>Section 1.1</h2>
 <p>In this section...</p>
 <p>More text</p>
 <h2>Section 1.2</h2>
 <p>In this second section...</p>
</html>
The XSLT shown in Example 5 uses XSLT 2.0's grouping capabilities to add section elements based on the position of the section headings. It creates two levels of groups. First, it uses a for-each-group instruction that groups all of the children of html using the attribute group-starting-with="h1". This means that an h1 element signals the beginning of a group at this level. For each of these groups, the XSLT is inserting a section level="1" element.
Secondly, it has an inner for-each-group that calls the current-group function to get all of the items in the h1 group, and create subgroups out of those. The beginning of a subgroup is identified by an h2 element.
Inside the inner for-each-group, it tests to see whether the group contains an h2 element using the XPath current-group()[self::h2]. It does this because a group will be created containing everything that appears before the first h2 element, which in our case is just the h1 element. I do not want a separate section level="2" around that element.
<xsl:stylesheet version="2.0"
 xmlns:xsl="http://www.w3.org/1999/XSL/Transform">

<xsl:template match="html">
 <document>
  <xsl:for-each-group select="*" group-starting-with="h1">
   <section level="1">
    <xsl:for-each-group select="current-group()" group-starting-with="h2">
     <xsl:choose>
      <xsl:when test="current-group()[self::h2]">
       <section level="2">
        <xsl:apply-templates select="current-group()"/>
       </section>
      </xsl:when>
      <xsl:otherwise>
       <xsl:apply-templates select="current-group()"/>
      </xsl:otherwise>
     </xsl:choose>
    </xsl:for-each-group>
   </section>
  </xsl:for-each-group>
 </document>
</xsl:template>

<xsl:template match="h1|h2">
 <heading>
  <xsl:apply-templates/>
 </heading>
</xsl:template>

<xsl:template match="node()">
 <xsl:copy>
  <xsl:copy-of select="@*"/>
  <xsl:apply-templates/>
 </xsl:copy>
</xsl:template>

</xsl:stylesheet>
The output of the XSLT, which contains two levels of section elements, is shown in Example 6.
<document>
 <section level="1">
  <heading>Chapter 1</heading>
  <section level="2">
   <heading>Section 1.1</heading>
   <p>In this section...</p>
   <p>More text</p>
  </section>
  <section level="2">
   <heading>Section 1.2</heading>
   <p>In this second section...</p>
  </section>
 </section>
</document>
Instead of grouping based on a beginning element, it is sometimes necessary to group items that are adjacent to each other. One case is list items, which might appear as siblings of normal paragraphs rather than grouped together in a list. To do that, a for-each-group instruction can use the attribute group-adjacent instead of group-starting-with.
Inferring structure from section numbers
Sometimes we want to group and infer structure at the same time. All the text in the input document in Example 7, unlike previous examples, is marked up as generic paragraphs. The only way to determine the structure is by testing the content for patterns.
<document>
 <p>Chapter 1: In the beginning</p>
 <p>In this chapter...</p>
 <p>1.1 Introduction</p>
 <p>In this section...</p>
 <p>More text</p>
 <p>1.2 Next Steps</p>
 <p>In this second section...</p>
</document>
The easiest way to accomplish this is with an XSLT like the one in in Example 8 that takes two passes at the document, using modes to separate the functionality of the two passes.
<xsl:stylesheet version="2.0"
 xmlns:xsl="http://www.w3.org/1999/XSL/Transform">
<xsl:variable name="chapRegex" select="'^\s*Chapter\s+(\d+)\s*:\s*(.*)$'"/>
<xsl:variable name="secRegex" select="'^\s*(\d+\.\d+)\s*(.*)$'"/>

<xsl:template match="document">
 <xsl:variable name="renamed" as="element()*">
  <xsl:apply-templates select="*" mode="rename"/>
 </xsl:variable>
 <document>
  <xsl:for-each-group select="$renamed" group-starting-with="chapTitle">
   <chapter num="{replace(current-group()[self::chapTitle],$chapRegex,'$1')}">
    <xsl:for-each-group select="current-group()" group-starting-with="secTitle">
     <xsl:choose>
      <xsl:when test="current-group()[self::secTitle]">
       <section num="{replace(current-group()[self::secTitle],$secRegex,'$1')}">
        <xsl:apply-templates select="current-group()"/>
       </section>
      </xsl:when>
      <xsl:otherwise>
       <xsl:apply-templates select="current-group()"/>
      </xsl:otherwise>
     </xsl:choose>
    </xsl:for-each-group>
   </chapter>
  </xsl:for-each-group>
 </document>
</xsl:template>

<xsl:template match="p[matches(.,$chapRegex)]" mode="rename">
 <chapTitle>
  <xsl:copy-of select="node()"/>
 </chapTitle>
</xsl:template>

<xsl:template match="p[matches(.,$secRegex)]" mode="rename">
 <secTitle>
  <xsl:copy-of select="node()"/>
 </secTitle>
</xsl:template>

<xsl:template match="text()" priority="1">
 <xsl:choose>
  <xsl:when test="matches(.,$chapRegex) and (. is parent::chapTitle/node()[1])">
   <xsl:value-of select="replace(.,$chapRegex,'$2')"/>
  </xsl:when>
  <xsl:when test="matches(.,$secRegex) and (. is parent::secTitle/node()[1])">
   <xsl:value-of select="replace(.,$secRegex,'$2')"/>
  </xsl:when>
  <xsl:otherwise>
   <xsl:copy-of select="."/>
  </xsl:otherwise>
 </xsl:choose>
</xsl:template>

<xsl:template match="node()" mode="#all">
 <xsl:copy>
  <xsl:copy-of select="@*"/>
  <xsl:apply-templates mode="#current"/>
 </xsl:copy>
</xsl:template>

</xsl:stylesheet>
The first pass determines which p elements actually represent chapter titles and section titles, and renames them to simplify the later grouping pass. A variable $renamed is created that contains the results of the first pass. Within its definition, templates are applied with the mode rename. Two template rules in the rename mode look for paragraphs that are chapter or section titles and rename them. To determine this, they use the matches function (new in XSLT 2.0) that determines whether a string matches a regular expression. In this case, the regular expressions are represented by the variables $chapRegex and $secRegex.
Example 9 shows the value of the $renamed variable after the first pass, although it doesn't appear directly in the results.
<document>
 <chapTitle>Chapter 1: In the beginning</chapTitle>
 <p>In this chapter...</p>
 <secTitle>1.1 Introduction</secTitle>
 <p>In this section...</p>
 <p>More text</p>
 <secTitle>1.2 Next Steps</secTitle>
 <p>In this second section...</p>
</document>
The second pass starts with the for-each-group instruction, whose select attribute indicates that it operates on the $renamed variable instead of the input document. The second pass uses grouping logic much like the previous example to create two levels of structure: chapter and section.
It also creates num attributes that contain the chapter and section numbers. To do this, it uses replace, another new function in XSLT 2.0. The replace function is using three arguments: the first is the text to modify, the second is the regular expression that matches the part to be replaced, and the third is the replacement string. In this case, the third argument makes use of sub-expressions, where "$2" means that it should include the text that matched the second set of parentheses in the regular expression.
The text() template rule removes the chapter and section numbers from the content, because they are being moved to the num attribute. This too uses the replace function. I have to be careful not to replace every text node that matches the pattern, so I test if it's the first text node in that parent.
The node() template rule copies all elements that don't have more specific templates. The use of mode="#all" means that this template is used whether I am in rename mode or have no mode in use. When I apply templates from within this template rule, I use the mode="#current" to indicate stay in whatever mode matched the template in the first place.
Although modes are not new in XSLT 2.0, the use of #all and #current keywords is new, as is the ability to make several passes at a document. Because of restrictions on temporary result trees, this was not possible in XSLT 1.0.
The final output is shown in Example 10.
<document>
 <chapter num="1">
  <chapTitle>In the beginning</chapTitle>
  <p>In this chapter...</p>
  <section num="1.1">
   <secTitle>Introduction</secTitle>
    <p>In this section...</p>
    <p>More text</p>
   </section>
   <section num="1.2">
    <secTitle>Next Steps</secTitle>
    <p>In this second section...</p>
   </section>
 </chapter>
</document>
Using style information
Named styles are an important resource in determining the true structure of a document. Although generally meant to specify and standardize formatting, it can also convey the structure and meaning of the content. In many technologies, the structure and the style are two different things. For example, in Microsoft Word, text is structured into paragraphs, and styles are applied to those paragraphs, or to text runs within paragraphs. In HTML, structural elements may come in different varieties like h1 and p but they may also have "styles" applied to them using class attributes that refer to CSS stylesheets.
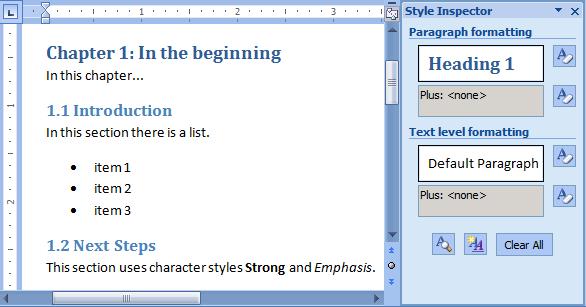
A Microsoft Word document that uses styles is depicted in Figure 1, where Heading 1 and Heading 2 paragraph styles are used for the section headings, and character styles Emphasis and Strong are used for inline text formatting.
I saved this document as Word XML before running it through an XSLT. The Word XML is not shown here because it is large and complex, but it is available in the examples for download.
I recommend creating a style mapping document, an example of which is shown in Example 11. It maps the styles in the input document to the desired structural elements in the results. This make the conversion more general purpose and flexible, and easier to maintain over time.
<styles>
 <style>
  <name>BodyText</name>
  <name>Normal</name>
  <transformTo>p</transformTo>
 </style>
 <style>
  <name>ListParagraph</name>
  <transformTo>li</transformTo>
 </style>
 <style>
  <name>Heading1</name>
  <transformTo>h1</transformTo>
 </style>
 <style>
  <name>Heading2</name>
  <transformTo>h2</transformTo>
 </style>
 <style>
  <name>Emphasis</name>
  <transformTo>em</transformTo>
 </style>
 <style>
  <name>Strong</name>
  <transformTo>strong</transformTo>
 </style>
</styles>
The XSLT shown in Example 12 converts the Word XML document to XML, creating the elements specified style map. It only has to define template rules for two elements: w:p (paragraph) and w:r (text run). For each of these, it determines the associated style and looks up that style in the style map. It then creates an XML element using xsl:element with the name found in the transformTo in the style map.
<xsl:stylesheet version="2.0"
 xmlns:xsl="http://www.w3.org/1999/XSL/Transform"
 xmlns:w="http://schemas.openxmlformats.org/wordprocessingml/2006/main"
 exclude-result-prefixes="w">
<xsl:variable name="styles" select="doc('stylemap.xml')/styles/style"/>

<xsl:template match="/">
 <document>
  <xsl:apply-templates select=".//w:p"/>
 </document>
</xsl:template>

<xsl:template match="w:p">
 <xsl:variable name="elName"
     select="$styles[name=current()/w:pPr/w:pStyle/@w:val]/transformTo"/>
 <xsl:choose>
  <xsl:when test="$elName != ''">
   <xsl:element name="{$elName}">
    <xsl:apply-templates select="*"/>
   </xsl:element>
  </xsl:when>
  <xsl:otherwise>
   <!-- paragraphs without a listed style are just plain p's -->
   <p>
    <xsl:apply-templates select="*"/>
   </p>
  </xsl:otherwise>
 </xsl:choose>
</xsl:template>

<xsl:template match="w:r">
 <xsl:variable name="elName"
     select="$styles[name=current()/w:rPr/w:rStyle/@w:val]/transformTo"/>
 <xsl:choose>
  <xsl:when test="$elName != ''">
   <xsl:element name="{$elName}">
    <xsl:apply-templates select="*"/>
   </xsl:element>
  </xsl:when>
  <xsl:otherwise>
   <xsl:apply-templates select="*"/>
  </xsl:otherwise>
 </xsl:choose>
</xsl:template>

</xsl:stylesheet>
Sample output is shown in Example 13. Although in this case I have not actually added or inferred new information, I have combined structure and style into one set of tags. Once I have reached this step, I can apply the other techniques described in this article to add structure and recognize textual patterns.
<document>
 <h1>Chapter 1: In the beginning</h1>
 <p>In this chapter...</p>
 <h2>1.1 Introduction</h2>
 <p>In this section there is a list.</p>
 <li>item 1</li>
 <li>item 2</li>
 <li>item 3</li>
 <h2>1.2 Next Steps</h2>
 <p>This section uses character styles <strong>Strong</strong>
       and <em>Emphasis</em>.</p>
</document>
Although this example uses Microsoft Word, a similar conversion can be performed on XHTML using class attributes to determine the styles. A bonus example is provided in the zip download that does just that.
Using formatting information
In some situations, named style information is not available. In the case of Microsoft Word, a variety of users may have created the input documents using different techniques, including directly applying font changes rather than using styles. Similarly, in HTML, an author or tool may have applied individual style attributes to paragraphs and other elements rather than defining reusable CSS classes. In these cases, to infer the structure you have to rely on text formatting such as font size and font effects like bold and italics. This can be less reliable and consistent than styles, but can still yield important clues.
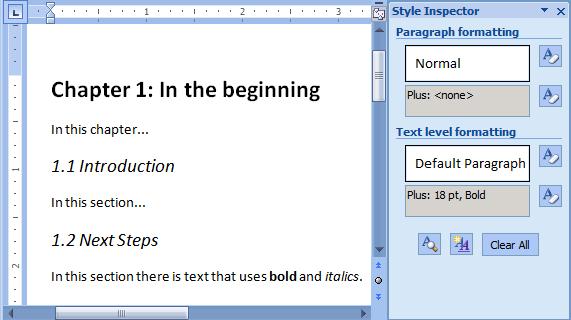
A Word document that uses direct formatting rather than styles is shown in Figure 2. Rather than using styles, the author of this document kept everything in the "Normal" style and directly changed the font size and applied bold and italics to make some paragraphs appear to be headings.
The XSLT shown in Example 14 converts the Word document to XML based on its formatting information rather than style names. It tests the size of the font and whether it is in bold or italics in order to determine whether it is a 1st-level or 2nd-level heading. In this type of conversion, a style map is less useful because the mapping rules are more complex and best expressed as XSLT and XPath code.
<xsl:stylesheet version="2.0"
 xmlns:xsl="http://www.w3.org/1999/XSL/Transform"
 xmlns:w="http://schemas.openxmlformats.org/wordprocessingml/2006/main"
 exclude-result-prefixes="w">
<xsl:output method="xml" indent="yes"/>
<xsl:template match="/">
 <document>
  <xsl:apply-templates select=".//w:p"/>
 </document>
</xsl:template>

<xsl:template match="w:p">
 <xsl:variable name="size" select="w:pPr/w:rPr/w:sz/@w:val"/>
 <xsl:choose>
  <xsl:when test="($size > 32) and exists(w:pPr/w:rPr/w:b)">
   <h1>
    <xsl:apply-templates select="*"/>
   </h1>
  </xsl:when>
  <xsl:when test="($size > 25) and exists(w:pPr/w:rPr/w:i)">
   <h2>
    <xsl:apply-templates select="*"/>
   </h2>
  </xsl:when>
  <xsl:otherwise>
   <p>
    <xsl:apply-templates select="*" mode="char-formatting"/>
   </p>
   </xsl:otherwise>
 </xsl:choose>
</xsl:template>

<xsl:template match="w:r" mode="char-formatting">
 <xsl:choose>
  <xsl:when test="w:rPr/w:b">
   <b>
    <xsl:apply-templates select="*"/>
   </b>
  </xsl:when>
  <xsl:when test="w:rPr/w:i">
   <i>
    <xsl:apply-templates select="*"/>
   </i>
  </xsl:when>
  <xsl:otherwise>
   <xsl:apply-templates select="*"/>
  </xsl:otherwise>
 </xsl:choose>
</xsl:template>

</xsl:stylesheet>
Sample output is shown in Example 15.
<document>
 <h1>Chapter 1: In the beginning</h1>
 <p>In this chapter...</p>
 <h2>1.1 Introduction</h2>
 <p>In this section...</p>
 <h2>1.2 Next Steps</h2>
 <p>In this section there is text that uses <b>bold</b>
   and <i>italics</i>.</p>
</document>
An analogy in XHTML is the use of style attributes or formatting elements like font and center.
Caveats and conclusions
All of the examples used in this article are fairly simple for educational purposes. The content you encounter in the real world is likely to be more complex. In some scenarios, you will encounter fairly uniform input documents, for example if you are converting Word documents that have been carefully corrected by a production editor, or XHTML documents that were consistently generated by an application.
Often, though, content is messy. If content was hand-created by humans, it is likely to have many variations. Therefore, when you create your XSLT, you should never assume consistency. Test the assumptions in your code frequently and write templates that catch unhandled situations and emit warning messages.
Mixed content deserves special attention. If you are converting documents that contain mixed content, be sure to use apply-templates liberally rather than value-of, which can inadvertently flatten mixed content.
Whitespace is also crucial when processing narrative content. Avoid indenting output in your XSLT because it may introduce unintended whitespace. Conversely, avoid stripping whitespace from the input document in case it was there for a reason.
Human review of your output is always recommended. Although this can be time-consuming for a large body of content, it is worth it to at least spot check the output to identify repetitive errors.
About the author
Priscilla Walmsley serves as Managing Director and Senior Developer at Datypic. She specializes in XML technologies, architecture and implementation. She is the author of Definitive XML Schema (Prentice Hall, 2012), and XQuery (O'Reilly Media, 2015). In addition, she co-authored Web Service Contract Design and Versioning for SOA (Prentice Hall, 2008).
About Datypic
Datypic provides development services and training, specializing in XML, content management and electronic publishing. We are experts in XML-related technologies such as XML Schema, XSLT and XQuery, and have extensive experience with software development and implementation.
We participate in projects ranging from one day to many months, anywhere in the world. We can arrange to work remotely or at your site, whichever you prefer.
For more information, please read about our services at datypic.com.
About this article
A prior version of this article was first published by IBM developerWorks. Its current version number is 2.0 and it was last updated on April 30, 2014.